Caring for the eggs: D0–D3 incubation + methylene blue
The 72 hours from spawning to hatching are critical — a complete guide to caring for discus eggs, methylene blue dosing, when the parents fan, signs of dead eggs and transfer to an artificial incubator.
Quick summary
- The 72h window from spawning (D0) to hatching is the most vulnerable phase of the whole process
- Healthy eggs = translucent yellow-orange, 1.5–2 mm; unfertilized = milky white after 6–12h
- The biggest threats: Saprolegnia (white fungus), lack of fertilization, parents abandoning or eating the eggs
- Methylene blue (3–5 drops/L) is your antifungal ally — but don't use it preventively on good parents
- Hatching: 48–60h at 30–31°C (86–88°F); larvae attach to the surface with an adhesive thread
- The best thing you can do is usually NOTHING — if the parents are fanning, stay away
- An artificial incubator (€50–90) is Plan B for repeatedly lost spawns, not Plan A
Caring for the eggs — the critical 72 hours
Caring for discus eggs (Symphysodon) in the D0–D3 window (from spawning to hatching) is the most vulnerable phase of the whole breeding process. The eggs, laid on a vertical surface (cone, leaf, wall), are completely dependent on a fungus- and bacteria-free environment, abundant oxygen and constant fanning provided by the parents. In 72 hours it's decided whether you'll have 200 fry or 0. The biggest threats: Saprolegnia (white fungus), lack of fertilization (dead eggs), parents abandoning the spawn or eating the eggs. This guide shows you exactly what to do each hour, when to add methylene blue (3–5 drops/L), when to intervene and when not to, plus the full protocol for artificial incubation if the parents fail.
The anatomy of discus eggs
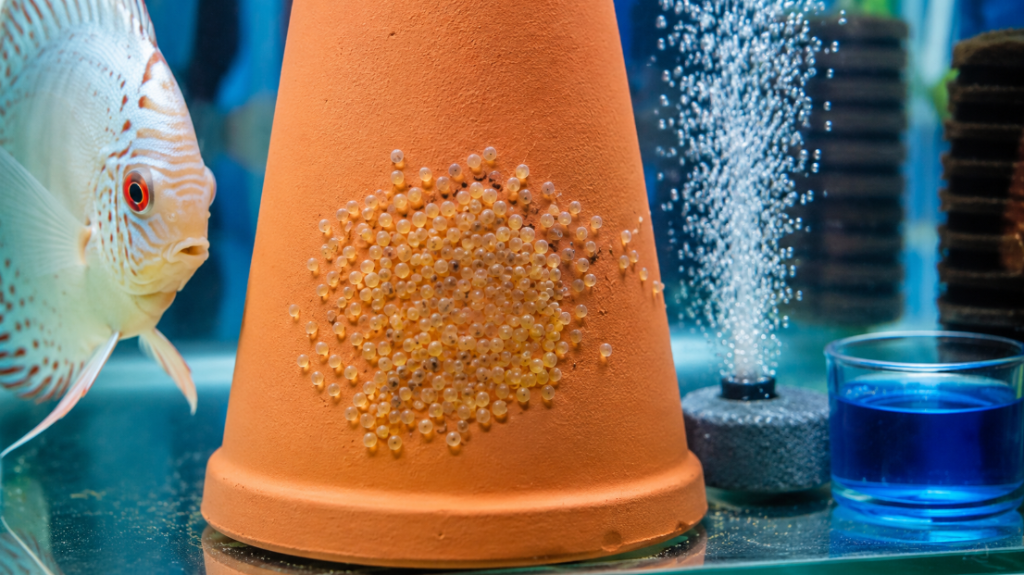
A healthy egg:
- Size: 1.5–2 mm (0.06–0.08 in) diameter
- Color: translucent yellow-orange
- Look: spherical, slightly adhesive (attached to the surface)
- Inside: the yolk (the nutrient sac) + a developing embryo
An unfertilized egg:
- More opaque, milky-white after 6–12h
- Doesn't develop at all
- Becomes a target for fungus
Number laid per spawn: 80–300 eggs (varies with the female's age and size).
The incubation timeline — hour by hour
Hour 0 — Spawning (takes 30–90 min)
What you see:
- The female lays parallel rows on the previously cleaned surface
- The male follows immediately, fertilizing each row
- They both do this in sync, rhythmically
What YOU do: NOTHING. Stay away, don't disturb, don't turn on lights.
Hour 1–12 — Stabilization
What happens:
- The eggs "set" better on the surface
- The first cell division begins
- The parents begin "fanning" (ventilating with their fins)
What you see: ✅ Both parents stay close to the eggs ✅ Their fins move constantly and rhythmically by the eggs ✅ The parents mouth-clean the eggs (lightly touch with the mouth) ✅ The eggs stay uniformly yellow-orange
Red flags: ⚠️ The parents MOVE AWAY and don't come back — abandonment ⚠️ They eat eggs in the first 2–4 hours — parental instability (see the dedicated section)
Hour 12–24 — The first visual changes
Under a microscope or magnifier:
- The embryo starts to be visible as a small dot
- The yolk (yellow) moves around the embryo
- About 10–20% of the unfertilized eggs turn milky white
IMPORTANT actions:
- DO NOT TURN ON bright LIGHTS — stress for the parents
- DO NOT DO A WATER CHANGE — it disrupts the microscopic chemistry
- JUST OBSERVE — 5–10 min of observation/hour
Partial darkness = ideal. Dim ambient light is enough.
Hour 24–48 — Embryonic development
What you see with careful observation:
- The embryo becomes visible as a dark comma
- Slight movements inside (with a magnifier)
- The embryo's eyes appear as two darker dots
- The dead (white) eggs are eaten by the parents or removed with the mouth
WATCH OUT: if 30%+ of the eggs turn white in this interval, it's a serious problem. See the section "When to intervene with methylene blue".
Hour 48–60 — Close to hatching
The eggs' look:
- The embryo already takes up 50–70% of the egg
- The yolk sac (yellow) looks smaller
- The embryos' tails start to move visibly with the naked eye
- The eggs' "pulsing" is obvious
The parents:
- More active, fanning intensely
- "Talking" to each other (a pre-hatch signal)
- They may do extra cleaning
Hour 60–72 — Hatching
The process:
- The larvae break the egg membrane and emerge
- They're small (3–4 mm / 0.12–0.16 in), almost transparent, with a large yolk sac
- They don't swim yet — attached to the spawning surface by an adhesive thread
- The parents eat the shells (natural cleanup)
This moment takes 2–6 hours — all the larvae hatch roughly simultaneously.
Methylene blue — a complete guide
Methylene blue is your most important ally in the first 72h. A mild antifungal and antibacterial, NON-toxic to eggs/larvae.
How it works:
- Inhibits Saprolegnia (the white fungus)
- Reduces the bacterial load in the water
- Oxygenates through its chemical properties
- Colors the water slightly blue — a bonus stress-reducing effect on the parents (more opaque)
When to use it:
| Scenario | Decision |
|---|---|
| Good parents, first spawn | ❌ NO — let nature work |
| A spawn with 10–20% white eggs | ✅ YES — preventively |
| A spawn with 30%+ white eggs | ✅ YES — urgently |
| Transfer to an artificial incubator | ✅ YES — MANDATORY |
| Parents that abandon | ✅ YES — together with an incubator |
Dosing:
Standard concentration for eggs:
- 3–5 drops per 1 liter (0.26 US gal) of water
- Equivalent: 15–25 drops per 5 liters (1.3 US gal) (a small incubator)
- A 1% solution is available in pharmacies and pet shops
For the whole tank (with parents on the spawn):
- 1–2 drops per liter (a lower concentration so you don't stress the adults)
- Apply to the spawning AREA with a needle-free syringe (not all over the tank)
How to apply:
- Use a needle-free syringe (5–10 ml)
- Dilute in 50 ml of tank water
- Apply SLOWLY, DIRECTLY on/by the spawn
- Re-apply at 24 hours if white eggs persist
Cautions:
⚠️ Methylene blue kills the beneficial bacteria in the filter if it's too much — use it SPARINGLY ⚠️ No more than 72h in a row — toxic to the biological system ⚠️ Activated carbon in the filter absorbs it — remove it if you're treating ⚠️ The water will turn BLUE — normal, it clears in 3–5 days with carbon
Signs that the eggs are HEALTHY
✅ A uniform yellow-orange color across the WHOLE spawn ✅ The parents fan constantly — actions speak louder than words ✅ Dead eggs stay at 5–15% (acceptable) ✅ Visible development at 24h (embryo dot, at 48h embryo comma) ✅ The parents get aggressive when you approach (a sign they're protective) ✅ The surface around the spawn stays clean
Signs that the eggs are in DANGER
⚠️ 30%+ turn white in 12h — poor fertilization OR Saprolegnia ⚠️ Covered with white threads (mold) — Saprolegnia confirmed, an emergency ⚠️ The parents move away and don't return — abandonment ⚠️ The eggs "fall" off the surface — poor adhesion (water too soft?) ⚠️ Mucus on the eggs — bacterial Columnaris (extremely rare but serious) ⚠️ Dead hatched larvae at 60h — incomplete fertilization
WHEN to intervene with a transfer to an INCUBATOR
Absolute indications (immediate transfer):
- The parents eat the eggs repeatedly (3+ consecutive spawns)
- Abandonment at 12h+ after spawning
- 70%+ white eggs at 24h
- The parents fight and disturb the spawn
- Massive Saprolegnia that doesn't respond to methylene blue
Relative indications (your call):
- You've invested a lot in the pair and want to ensure success
- You're an experienced breeder with the equipment
- The previous batch was lost
Protocol — TRANSFER TO AN ARTIFICIAL INCUBATOR
Equipment needed:
- A 3–10L (0.8–2.6 US gal) container of clear plastic (or a small tank)
- An air pump + a porous diffuser
- A 25–50W heater (with a thermostat)
- Methylene blue 1%
- A digital thermometer
Step-by-step procedure:
Step 1: Prepare the incubator (4 hours in advance)
- Fill the container with water from the breeding tank (NOT tap!)
- Set it to exactly 30°C (86°F) (the same as the parent tank)
- Add 3–5 drops of methylene blue per L
- Start gentle aeration (SMALL bubbles, NOT a jet)
- Check: the water must be completely stable
Step 2: Removing the eggs
If the spawn is on the CONE (easiest):
- Turn the lights fully off (the parents calm down)
- Slowly put your hand into the water
- Grab the cone with the eggs UNDER water (do NOT lift it above the surface!)
- Transfer to the incubator in 5–10 seconds
- Set the cone with the egg face UP or sideways
If the spawn is on a LEAF/WALL:
- Use a clean razor or thin blade
- Cut out a small rectangle around the spawn
- Transfer quickly with the surface facing up
⚠️ DO NOT EXPOSE THE EGGS TO AIR for more than 2–3 seconds — they suffocate!
Step 3: Care in the incubator (72h)
Daily:
- Check the temperature (30–30.5°C / 86–87°F)
- Siphon out the white/dead eggs with a syringe (don't leave them, they contaminate)
- Change 20–30% of the water every 24h (with water pre-prepared to the same parameters + methylene blue)
- Check the air bubbles — gentle circulation, NOT a strong jet
- Re-add 2–3 drops of methylene blue per L at each water change
At 48h:
- See the embryos with a magnifier — confirm viability
- Methylene blue can be reduced if things are going well
At 60–72h — hatching:
- The larvae detach from the surface
- Continue methylene blue for another 24h
- Don't feed yet (they have a yolk sac for 3–4 days)
Step 4: Transition to a grow-out tank
At 4–5 days after hatching:
- The larvae swim freely
- Transfer to a fry grow-out tank (see water for fry)
- Start feeding with brine shrimp nauplii (see daily fry feeding)
Success rates — natural vs artificial
| Method | Hatch rate | 4-week survival | Total success |
|---|---|---|---|
| Good parents (experienced) | 85–95% | 70–90% | 60–85% |
| Young parents (first spawn) | 30–60% | 40–70% | 15–40% |
| Artificial incubator | 70–85% | 50–70% (no parental mucus) | 35–60% |
Conclusion: if the parents are good, leave them be. The artificial incubator is Plan B, not Plan A.
Estimated costs
Costs vary by country — the figures below are orientation estimates only:
| Equipment | Cost |
|---|---|
| Methylene blue 1% (100 ml) | €5–10 |
| A small air pump | €8–15 |
| Incubator container (3–10L / 0.8–2.6 US gal) | €10–25 |
| 25W heater with thermostat | €15–25 |
| Digital thermometer | €10–15 |
| Total artificial incubator | €50–90 |
Conclusion
The first 72 hours of a discus spawn are a lesson in patience and observation. The best thing you can do is NOTHING — if the parents are fanning, don't approach, don't change the water, don't change anything.
Intervene ONLY when things are visibly going wrong (massive white eggs, abandonment, fungus). Methylene blue is your friend, but don't use it preventively on good parents.
The artificial incubator is a €50–90 investment that can save repeatedly-lost spawns — but it's Plan B, not the standard. Discus are excellent parents when you create the right conditions for them.
🛒 See the treatments and medications for the aquarium in the Discus.ro shop — including methylene blue.
See also Conditioning the pair, The breeding process, White eggs, artificial fry raising and Breeding tank — setup.
Recommended products
Picked from the shop based on what you just read
Recommendations are selected from the discus.ro shop based on this guide's topic. Availability and prices may vary.