Discus breeding tank: complete setup and a €600–1000 budget
A step-by-step breeding tank setup for discus — 180L bare-bottom dimensions, a ceramic cone, a sponge filter, remineralized RO water at TDS 80–120 ppm, a 14-day prep timeline, a final checklist and a total budget of €600–1000.
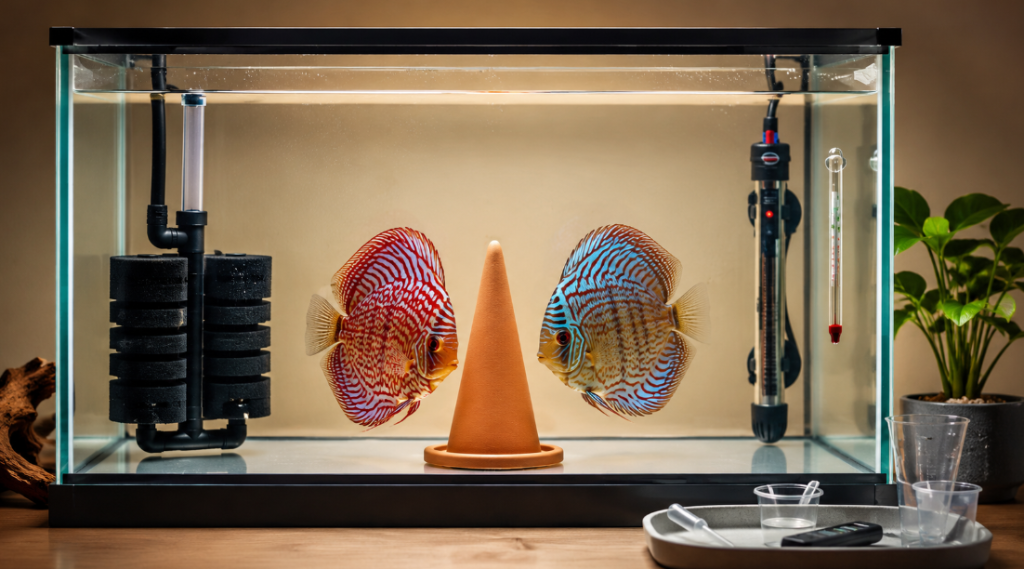
Quick summary
- Tank: 180L (48 US gal) bare-bottom, 90×45×45 cm (35×18×18 in) recommended. Minimum 120L (32 US gal)
- Substrate: NONE — a painted black/brown background for security
- Spawning site: a 15–20 cm (6–8 in) ceramic cone (€8–20) or an Anubias leaf
- Filter: a sponge filter is ESSENTIAL (air-driven) — never external (it sucks up fry)
- Parameters: 30–31°C (86–88°F), pH 5.8–6.5, KH 1–3 dKH, TDS 50–150 ppm, remineralized RO water
- Total budget: €300–500 (without the tank), €600–1000 including the tank
In short
- Tank: 180L (48 US gal) bare-bottom, 90×45×45 cm (35×18×18 in) — recommended. Minimum 120L (32 US gal) (80×40×40 cm / 31×16×16 in).
- Substrate: NONE — a painted black/brown bottom for security.
- Spawning surface: a 15–20 cm (6–8 in) ceramic cone (€8–20) or an Anubias leaf.
- Filter: a sponge filter is ESSENTIAL (air-driven) — never external (it sucks up fry).
- Heating: 2× 100W with a ±0.5°C (±1°F) thermostat (safety).
- Parameters: 30–31°C (86–88°F), pH 5.8–6.5, KH 1–3 dKH, TDS 50–150 ppm, remineralized RO water.
- Lighting: dim (30% of normal), 3000–5000K, 8–10h/day + a night light.
- Total budget: €300–500 (without the tank), €600–1000 including the tank.
What you'll learn
The discus breeding tank (Symphysodon) is the investment that makes the difference between occasional breeding with low success rates and a consistent hatchery with regular spawns. While discus can lay eggs in a community tank, a dedicated tank offers: a far higher success rate (precisely controlled parameters), protection for the eggs and fry from curious fish, reduced stress for the pair, easy monitoring, and the ability to apply precise conditioning and artificial-raising protocols. The optimal setup: a 180L (48 US gal) bare-bottom tank (90×45×45 cm / 35×18×18 in), a ceramic spawning cone, an air-driven sponge filter (not external — it sucks up fry), 2× 100W heaters with a ±0.5°C thermostat, remineralized RO water at TDS 80–120 ppm. This guide walks you through each component, the 14-day prep timeline and the total budget of €600–1000.
Why a dedicated breeding tank?
✅ A far higher success rate (controlled parameters) ✅ Protection for eggs and fry (no other curious fish) ✅ Reduced stress for the pair ✅ Easy monitoring of the process ✅ Parameter control for each phase ✅ Applying specialized protocols (conditioning, fry feeding)
Tank size
| Dimensions | Volume | For |
|---|---|---|
| 80×40×40 cm (31×16×16 in) | 120 L (32 US gal) | The absolute minimum |
| 90×45×45 cm (35×18×18 in) | 180 L (48 US gal) | Recommended |
| 100×50×50 cm (39×20×20 in) | 250 L (66 US gal) | Premium |
Shape: tall and narrow > wide and flat. Discus prefer to spawn on vertical surfaces — you need a minimum height of 45 cm (18 in).
A lid is essential — it reduces heat loss, prevents jumping and keeps humidity for fry near the surface.
Substrate — bare bottom is essential
Bare bottom (no substrate) is THE STANDARD for breeding.
| Advantage | Why it matters |
|---|---|
| Perfect hygiene | A complete daily siphon |
| You monitor feces | Quick Hexamita diagnosis in fry |
| Effective treatments | No risk of absorption into substrate |
| You spot dropped eggs | A quick rescue |
| Easy cleaning | After each spawn |
A painted black or brown background — reduces reflection and makes the discus feel secure. Acrylic paint or a background film stuck on from outside.
The spawning site
Discus spawn on clean vertical surfaces. Tested options:
1. A ceramic cone ⭐⭐⭐⭐⭐ (the best)
- A red or brown ceramic cone, 15–20 cm (6–8 in) tall
- A rough surface — eggs adhere well
- Easy to remove after spawning (you can transfer the eggs for artificial raising)
- EU price: €8–20 (Aquasabi, Garnelio, eBay)
Positioning: in the middle or front, with free space around it for the parents.
2. A large Anubias leaf ⭐⭐⭐⭐
- Anubias barteri with 10–15 cm (4–6 in) leaves
- Tied to a rock or decor
- Natural and preferred by the pair
- Downside: the leaf wears over time
3. A vertical PVC pipe ⭐⭐⭐
- New, clean PVC tube, 8–12 cm (3–5 in) diameter, 20 cm (8 in) tall
- Clean with vinegar + hot water first
- Cheap (€1–2)
4. A flat vertical stone ⭐⭐⭐
- Slate or natural stone leaned against the wall
- A flat, clean surface
Water parameters for breeding
Stricter than for standard maintenance:
| Parameter | Optimal value |
|---|---|
| Temperature | 30–31°C (86–88°F) |
| pH | 5.8–6.5 |
| KH | 1–3 dKH |
| GH | 1–4 dGH |
| TDS | 50–150 ppm |
| Ammonia | 0 ppm |
| Nitrite | 0 ppm |
| Nitrate | <10 ppm |
| Oxygen | >6 mg/L |
How to reach these parameters:
- RO water + minimal remineralization — see reverse osmosis (RO) and RO water remineralization.
- Catappa (Indian almond) leaves for natural tannins — see blackwater.
- Stable KH 2–3 dKH — important for pH stability.
🧮 For a target TDS of 80–120 ppm, use the RO + tap water mixer calculator — get the exact recipe instantly.
Filtration — a sponge filter is ESSENTIAL
ESSENTIAL: a sponge filter, NOT an external filter!
Why a sponge?
✅ Gentle suction — can't swallow fry ✅ Excellent biological filtration ✅ Silent ✅ Easy to clean ✅ Cheap (€10–25)
Recommended models (Europe)
| Model | Price | For |
|---|---|---|
| Aquael Pat-Mini | ~€15 | Classic, recommended |
| Eheim Air Filter | ~€25 | Premium |
| Hydor Crystal Mini Sponge | ~€12 | Compact |
| Hailea (Chinese) | ~€8 | Budget |
Runs on an air pump — no motor that risks sucking up fry.
Positioning: in the corner opposite the spawning site, with no strong current.
Aeration
The air pump feeding the sponge also provides oxygenation. 2 air pumps (one spare) recommended.
Models: Tetra APS 50 (€10), Eheim Air (€25), JBL ProSilent (€20).
Heating
2 smaller heaters instead of one large one (safety against failure):
- 2 × 100 W for a 180 L (48 US gal) tank
- A precise thermostat (±0.5°C / ±1°F)
- Recommended brands: Eheim Jäger, Aquael, JBL ProTemp
See the detailed guide on the ideal discus temperature.
Lighting
Dim and diffuse — discus prefer filtered light for breeding.
| Setting | Value |
|---|---|
| Kelvin | 3000–5000 K (warm) |
| Intensity | 20–30% of normal |
| Hours/day | 8–10h with a gradual transition |
| Type | Simple LED, no high-tech |
At night: a dim night light (1W LED) — helps the discus guard the eggs and fry.
A minimalist layout
Minimal decor for breeding:
- 1 floating plant (Amazon frogbit) — shade and security
- 1 spawning cone + possibly 1 adjacent stone
- NOTHING ELSE
Why minimalism:
- Easy to clean
- No contamination
- Focus on the pair and fry
- Efficient daily siphoning
Preparing the tank — a 14-day timeline
Day -14 (2 weeks before)
- Full setup: tank, sponge filter, heaters, cone
- RO water remineralized to target parameters (see remineralization)
- Start the filter
Day -10
- Add mature biological media from another filter (a sponge from another tank)
- OR add starter bacteria (Seachem Stability, JBL Denitrol)
Day -7
- Test all parameters (see how to test your water)
- Add catappa leaves (1 leaf per 50L / 13 US gal)
- Let it mature for one more week
Day -3
- A final parameter check
- A light siphon if dust has gathered
Day 0 — transferring the pair
- In the morning, after the normal feeding in the main tank
- Transfer with a large net, stress-free
- Drip-acclimate for 1 hour if the parameters differ
Feeding the pair
2 weeks before — "conditioning"
See the full protocol in Conditioning the pair, 28 days.
- Protein-rich food: beef heart, brine shrimp, bloodworms
- 3–4 meals/day
- Extra vitamins (JBL Atvitol)
In the breeding tank
- Continue the protein diet
- 3 meals/day
- Siphon out leftovers immediately (a maximum of 10 min after feeding)
Signs that breeding is near
- The pair approaches the cone and inspects it
- Obsessive cleaning of the spawning surface
- Intensified colors in both partners
- A visible genital papilla — see Sexing discus
- Synchronized behavior — swimming together, touching
Daily maintenance during breeding
Daily
- Siphon out food leftovers (careful not to disturb the pair)
- Check the temperature
- Observe behavior
Every 2 days
- A 10–15% water change with same-parameter water
- Test critical parameters (pH, ammonia, nitrite)
DO NOT
❌ Large water changes (>25%) that shift the parameters ❌ Noise, strong disturbances ❌ Other interventions
The parental vs artificial method
| Aspect | With parents | Artificial |
|---|---|---|
| For | Beginners | Repeated losses |
| Intervention | Minimal | High |
| Success rate | 60–85% | 40–60% |
| Parental mucus | ✅ Yes | ❌ No — a substitute |
| Pair stress | Low | Eliminated |
See the detailed guides: the breeding process, egg care and incubation and raising fry for 12 weeks.
Common mistakes
❌ An external filter in the breeding tank → sucks up fry within 24h.
❌ Substrate (sand, gravel) → eggs get lost, hygiene impossible.
❌ Direct tap water → KH 8+ dKH, pH 7.5+ = inhibits fertilization.
❌ A single large heater (200W+) → a failure = a thermal catastrophe.
❌ Bright lights at night → the parents abandon the eggs.
❌ Large water changes during incubation → the eggs turn white.
❌ Abundant decor → hides the fry, hard to monitor.
❌ Skipping conditioning → delayed spawns or infertile eggs.
Final checklist — complete setup
- ☐ A 180L+ (48 US gal+) bare-bottom tank, dark bottom (black/brown)
- ☐ 2× 100W heaters with a precise thermostat
- ☐ A sponge filter (air-driven)
- ☐ 2 air pumps (1 spare)
- ☐ A ceramic spawning cone
- ☐ A simple LED lamp + a night light
- ☐ RO water remineralized to TDS 80–120 ppm
- ☐ Catappa leaves for tannins
- ☐ A digital thermometer
- ☐ Full tests (pH, ammonia, nitrite, KH, GH)
- ☐ A lid
- ☐ A filter cycled 14 days before transferring the pair
Total estimated budget (Europe)
Costs vary widely by country — the figures below are orientation estimates only:
| Category | Cost |
|---|---|
| 180L (48 US gal) tank + lid | €200–400 |
| 2× 100W heaters | €60–100 |
| Sponge filter + air pump | €30–50 |
| Ceramic cone | €8–20 |
| Thermometer + tests | €50–80 |
| LED lamp + night light | €40–80 |
| RO system (if you don't have one) | €100–250 |
| Catappa + remineralization | €20–40 |
| TOTAL without the tank | €300–500 |
| TOTAL with the tank | €600–1000 |
What to do next
📚 Continue learning:
- Conditioning the pair, 28 days — biological prep before transfer
- Sexing discus — confirm the pair
- Selecting the breeding pair — 7 quality criteria
- The breeding process — 6 phases step by step
- Egg care — 72h incubation
- Artificial raising — an essential Plan B
🔧 Practical resources:
- RO + tap water mixer calculator — the exact TDS for breeding
- Aquarium volume calculator — confirm the dimensions
- Breeding equipment — shop — cones, sponges, heaters
🐠 Final tip: Don't economize on the sponge filter and dual heaters — they're the only components between success and catastrophe. An external filter that sucks up fry, or a failed heater dropping the temp below 28°C (82°F), can cost you a whole spawn.
Recommended products
Picked from the shop based on what you just read
Recommendations are selected from the discus.ro shop based on this guide's topic. Availability and prices may vary.